A hairline crack appears near the sink. A chip shows up at the corner of the island, usually the week after a move or a holiday dinner. A seam that looked invisible for ten years suddenly starts to open. In every one of these moments, homeowners ask us the same question: do I need this fixed, or do I need a whole new countertop? It's rarely obvious from a photo, and the answer determines whether you're looking at a same-week, few-hundred-dollar repair or a multi-week, multi-thousand-dollar replacement.
We're in a good position to answer honestly, because we do both — fabrication and installation of new countertops, and repair and restoration work on existing ones, all day, every week, across the Triangle. We have no incentive to push a $4,000 replacement when a $150 repair will hold for another fifteen years, and no incentive to patch something that's structurally finished. This guide walks through every common type of countertop damage, how to tell which category yours falls into, what each path actually costs, and the handful of situations where the honest answer is "it depends on what's underneath, not what you can see."
Why This Decision Is Worth Getting Right
Getting this call wrong costs money in both directions. Replace a counter that only needed a $200 chip repair, and you've spent thousands of dollars and endured a week without a kitchen for no reason. Repair a counter that's actually failing from underneath — a water-damaged cabinet deck, a cracked slab with no structural support left — and you've paid for a fix that won't last the year, sometimes while masking a bigger problem that keeps getting worse. The right answer also isn't always the cheaper one in the short term: a counter installed in 2008 on soon-to-be-renovated cabinets, or a stone that's been discontinued and can't be patch-matched, often makes more sense to replace even when the damage itself is minor and technically repairable.
The Repair-or-Replace Checklist: Start Here
Before diagnosing anything material-specific, run your damage past this overview. It's the same triage we use on an in-home evaluation, and it resolves the decision correctly in the large majority of cases without needing a single tool.
| Type of Damage | Usually Repairable? | Typical Fix | Safe to DIY? |
|---|---|---|---|
| Edge or corner chip | Yes | Color-matched epoxy fill, polished flush | Small chips only, with care |
| Hairline surface crack | Yes | Epoxy injection and polish | Not recommended |
| Crack running edge-to-edge | Sometimes | Structural epoxy repair or reinforcement; replace if recurring | No |
| Separating seam | Yes | Reseam with color-matched filler | No |
| Light surface scratches | Yes | Buff and re-polish | Natural stone: yes, gently |
| Deep scratches / gouges | Yes, usually | Fill, sand, re-polish | No |
| Soaked-in stain | Usually | Poultice draw-out, then reseal | Yes, worth trying first |
| Etch mark (marble/limestone) | Often | Honing and re-polishing | Minor etches: yes |
| Heat scorch (quartz) | Sometimes | Sand and re-polish; deep scorches may show | No |
| Sink-cutout chip | Yes | Epoxy fill and reinforcement | No |
| Undermount sink separation | Yes | Re-adhere and re-brace | No |
| Water damage under the counter | No — address the base, not the stone | Replace damaged cabinet/substrate; counter often reused | No |
Chips: Almost Always Repairable
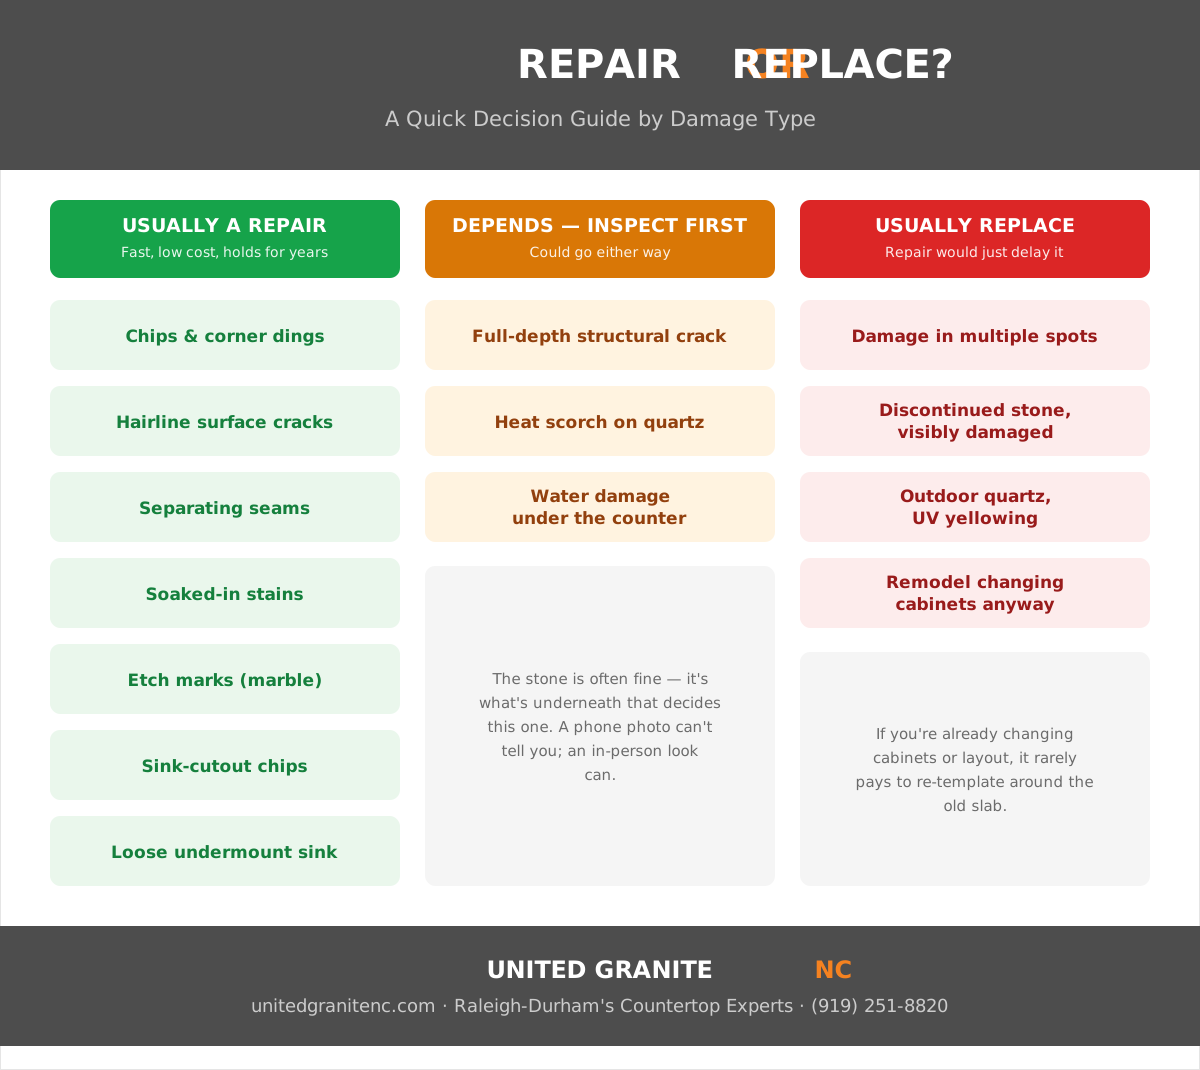
Chips are the most common damage we're called out for, and the best news in this entire guide: a chip almost never requires replacing the countertop. Whether it's a corner knocked during a move, an edge hit by a dropped cast-iron pan, or a small cutout chip from a sink installation, the fix is the same basic process — the area is cleaned, a tinted epoxy or polyester resin is color-matched to the stone, the chip is filled, and once cured it's sanded and polished flush with the surrounding surface. On granite and quartzite, a skilled repair tech can make a chip nearly disappear, especially in busier patterns where the fill blends into natural variation.
The one variable that matters is size and location. A quarter-inch chip on a flat field repairs invisibly. A larger chip that's lost its original piece, or one on a sharp mitered edge where light rakes across it, repairs *structurally sound* but may show as a faint color or texture difference up close — something worth knowing before you book the repair rather than after. Chips around a sink cutout get extra attention because that corner already carries stress from the cutout itself; we typically reinforce the underside with a support rod or epoxy bracing in addition to the cosmetic fill.
Cracks: It Depends on Where — and Why
Cracks split into two very different categories, and telling them apart is the whole ballgame. A hairline crack confined to the surface — often radiating from a sink cutout corner, a faucet hole, or a point of concentrated stress — is a classic candidate for epoxy injection: the crack is cleaned out, filled under pressure with a penetrating epoxy, and polished level. Done well, it stops the crack from spreading and is barely visible. These account for the great majority of crack calls we get.
A crack that runs the full depth of the slab, especially one that runs edge-to-edge or that you can see light through from below, is a different situation. That usually means the stone lost structural support at some point — an unsupported overhang that got leaned on, a cabinet that settled, a sub-surface that was never properly shimmed level. A structural crack can sometimes be stabilized with a reinforcing epoxy and a support bracket underneath, and it will often hold for years. But if the crack keeps growing, if it's near a large unsupported span, or if it's the second crack in the same slab, that's the pattern that points to replacement — because the problem isn't the crack, it's whatever keeps causing cracks, and a new slab properly supported fixes the actual cause.
Failed or Separating Seams
A well-fabricated seam should be nearly invisible and should stay that way for the life of the counter. When a seam starts to separate — a visible gap opens, you can feel a lip with your fingernail, or grime starts collecting in the line — it's almost always repairable rather than a replacement issue. The fix is a reseam: the old seam filler is ground out, the two slab edges are re-clamped tight, and a fresh color-matched seam filler is applied and polished flush.
What matters is diagnosing *why* the seam failed before you reseam it, because reseaming over an unfixed cause just buys you a repeat visit. The most common cause is movement in the cabinets or subsurface beneath the seam — settling, humidity swings in an un-conditioned space, or a support brace that was never installed at the seam in the first place. A proper reseam job addresses the support underneath, not just the visible gap on top. On a counter that's seamed in multiple places and failing at more than one, that's usually a sign the original installation under-supported the whole run, which is worth a full evaluation rather than seam-by-seam patching.
Scratches: Surface Marks vs. Real Damage
Most of what homeowners call "scratches" on granite, quartzite, and quartz are actually surface residue — hard water deposits, cutting board transfer, or a dulled patch in the polish — that buff out with a stone-safe polishing compound rather than needing any structural repair at all. True scratches, the kind you can catch a fingernail on, are rarer than people expect given how hard these materials are, precisely because kitchen knives and most cookware are softer than the stone itself.
When a genuine scratch or gouge does happen — usually from something harder than the counter itself, like a dragged cast-iron pot foot or a piece of broken ceramic — the repair is a progressive sanding and re-polishing of the affected area with diamond pads, working from a coarser grit down to the stone's final polish level, so the repaired patch matches the surrounding sheen rather than leaving a dull spot. Soapstone is the one material where light scratching is simply part of normal living with the stone rather than damage to fix: a fine sanding pad and a fresh coat of mineral oil blends most surface scratches back into the patina in minutes, which is exactly why soapstone owners can handle this step themselves. For everything else, see our complete guide to cleaning and removing countertop stains for what to try before assuming you need a repair call at all.
Stains: Soaked-In Discoloration
A stain happens when a liquid soaks into a porous surface — most often oil, wine, coffee, or fruit juice on granite, marble, or an unsealed natural stone — and leaves a dark or discolored patch behind. The good news is that most stains are genuinely fixable without replacing anything: a baking-soda-and-water poultice, or a commercial stone poultice product, is applied thickly over the stain, covered, and left for 24 to 48 hours. The poultice draws the trapped liquid back out of the stone as it dries, and the stain frequently lifts out completely or fades dramatically. The counter is then resealed, since a stain is usually a sign the sealer had already worn thin in that spot.
A persistent stain that won't lift after two or three poultice attempts has usually set deep enough that it's part of the stone's surface chemistry now rather than sitting on top of it — at that point, honing and repolishing the immediate area (natural stone only) can remove a thin top layer and take the discoloration with it. On engineered quartz, true staining is rare since the surface is non-porous; persistent discoloration there is more often heat damage or a UV effect than a soaked-in stain, which is a different fix entirely — see the heat-damage section below.
Etching: The Damage That Looks Like a Stain But Isn't
Etching is the single most misdiagnosed type of countertop damage, because it looks exactly like a stain — a dull, often ring-shaped mark, usually where a glass of wine or a splash of lemon juice sat — but it is not a stain and no amount of cleaning or poulticing will remove it. Etching is a chemical reaction: acid dissolves a microscopic layer of the stone's surface, leaving a rough, light-scattering spot that reads as dull rather than discolored. It's essentially exclusive to calcite-based stones — marble, limestone, travertine, and onyx — because granite, quartzite, and quartz contain little to no calcite and simply don't etch.
A light etch often buffs out with a marble polishing powder and a soft cloth, restoring the sheen in the affected spot. A deeper etch needs professional honing — a controlled, even sanding of the entire surface (not just the etched spot, to avoid creating a visible low patch) followed by re-polishing. This is genuinely a repair, not a replacement situation, even when it happens repeatedly — which is worth knowing, because etching is simply what marble does with acid, not a sign the stone or the installation has failed. If you're choosing a new stone and etching is a dealbreaker for how you live, that's a conversation worth having before you buy rather than after the first wine night; see our honest comparison of kitchen countertop materials for the full etching discussion.
Heat Damage & Scorch Marks
Heat damage is almost exclusively a quartz and laminate issue — the polymer resins that bind engineered quartz begin to soften and discolor around 300°F, well within range of a stovetop pan or an air-fryer basket set down directly. The result is a permanent white, gray, or yellowish ring that won't wipe off, because the resin itself has changed color and sometimes texture. Granite, quartzite, porcelain, and soapstone are all effectively immune to this kind of damage.
A light scorch on quartz can sometimes be improved with careful wet-sanding and repolishing of just the affected resin, though results vary — some discoloration is permanent because the resin itself has chemically changed, not just surface-marked. Severe heat exposure that's actually cracked or delaminated the slab (which can happen with a very hot pan plus a cold counter, creating thermal shock) is not repairable and does mean replacing that section. The real fix here is prevention: every quartz manufacturer's warranty excludes heat damage for exactly this reason, and a $10 trivet is cheaper than any repair on this list.
Sink Cutout Chips & Undermount Sink Separation
The sink cutout is the single highest-stress point on any countertop — it's a large hole cut into the slab, which removes material exactly where the counter needs strength, and it carries the weight of the sink plus whatever's in it. Chips at the cutout edge are common and, as with other chips, almost always repairable with epoxy fill, though we typically add a support rod or additional epoxy bracing underneath specifically at this location since it's a known stress point.
A more serious version of this problem is an undermount sink that's come loose from the stone entirely — you'll notice this as a gap, a drip line, or the sink itself shifting slightly when you lean on it. This happens when the original mounting clips or adhesive fail, often years after installation, and it's a repair, not a replacement: the sink is dropped, the old adhesive is cleaned off both surfaces, and the sink is re-mounted with fresh structural adhesive and new clips or a support bracket system. Left unaddressed, a separated undermount sink eventually leaks at the seam and can damage the cabinet below — which turns a straightforward sink repair into the much bigger problem covered two sections down.
Outdoor Fading & UV Discoloration
Outdoor kitchens add a damage category indoor counters never see: ultraviolet exposure. Engineered quartz is the material most affected — its resin binders yellow and can become brittle under sustained sun, which is why every quartz manufacturer voids the warranty for outdoor installation and why we don't recommend it for grill islands in the first place. Granite, quartzite, and porcelain are all UV-stable and essentially unaffected by sun exposure over time, which is exactly why those three dominate the outdoor countertops we install across the Triangle.
If you're seeing yellowing or chalkiness on an outdoor quartz counter, there is no cosmetic repair that reverses it — the resin itself has degraded, and sanding it back only exposes more degraded material underneath. This is one of the few cases on this list where the honest answer is replacement, ideally with a UV-stable material this time. Our outdoor kitchen countertops guide covers the right material choices from the start.
Water Damage Underneath the Countertop
This is the category most likely to surprise people, because the countertop itself is often completely fine — it's everything beneath it that's failed. A slow leak at a faucet base, a sink seam, or a dishwasher supply line can go unnoticed for months, soaking into particleboard or plywood cabinet decking and causing it to swell, soften, or rot. You'll usually notice it as a soft spot when you press near the sink, a slight sag in the counter, sudden movement in a stone slab that was previously rock-solid, or a musty smell from the cabinet below.
The stone itself in this scenario is rarely the problem and rarely needs full replacement — granite, quartz, and quartzite don't absorb enough water to rot, and the slab is usually structurally fine once it's properly re-supported. The fix is to address the base: remove the damaged cabinet decking or cabinet box, replace it with new, properly sealed material, and reset the existing slab on the repaired support — which is both less expensive and faster than fabricating a brand-new counter, provided the slab wasn't cracked in the process of coming loose. The one exception is if the water intrusion caused an already-marginal crack to fully propagate, or if mold has gotten into a seam and can't be fully cleaned out, in which case that section does need replacing. Either way, this is exactly the kind of damage where a phone diagnosis is unreliable — get it looked at in person before assuming either direction.
Material-by-Material: How Repairable Is Your Countertop?
Repairability isn't just about the type of damage — it's also about what the counter is made of. Some materials take a repair invisibly; others show it no matter how skilled the repair tech is. Here's the honest breakdown across the six surfaces we fabricate most.
| Material | Repair Difficulty | How Well Repairs Blend | Most Common Repair |
|---|---|---|---|
| Granite | Easy | Excellent — natural variation hides fills | Chip and crack epoxy repair |
| Quartz | Moderate | Good on solid colors; harder on patterns | Reseaming; limited heat-damage repair |
| Quartzite | Easy–Moderate | Very good — veining hides most fills | Chip repair, etch-proof so rarely needed for acid damage |
| Marble | Moderate | Good — but etching needs honing, not filling | Etch removal and honing |
| Porcelain | Difficult | Fair — printed surface pattern is hard to match | Edge/corner chip fill; large damage often needs panel replacement |
| Soapstone | Very Easy (often DIY) | Excellent — sanding blends into natural patina | Scratch sanding and reoiling |
The standout on this table is porcelain: it's an outstanding performer against heat, scratches, and stains, but because its color and veining are printed on the surface rather than running through the slab, a repaired chip can be harder to disguise than on a natural stone where every slab already has built-in variation. That's not a reason to avoid porcelain — it's a reason to have edge damage addressed quickly by someone experienced with the material, before it's tempting to let a small chip become a bigger one. Our complete porcelain countertops guide covers its strengths and caveats in full.
Why DIY Repair Kits Usually Disappoint
Home improvement stores sell granite and quartz chip-repair kits, and for a very small, shallow chip in an inconspicuous spot, they can be a reasonable stopgap. But most DIY attempts we get called in to fix twice share the same three problems. First, color matching: a professional repair tech mixes tinted epoxy on-site, test-curing small batches against the actual slab until the color disappears; a pre-tinted kit color ships in a handful of generic shades that rarely match a natural stone's specific variation. Second, cure and polish: kit epoxies often cure softer and duller than a professionally catalyzed repair compound, so the patch stays slightly recessed, slightly glossy or matte compared to the surrounding polish, and catches light differently forever. Third, and most expensive to undo, re-doing it right: once a DIY fill has cured in a chip or crack, a professional repair often has to grind out the failed attempt before doing the job properly, which can mean removing more original material than the damage itself required.
The exceptions where DIY genuinely makes sense: light scratch buffing with a stone-specific polishing compound, a first poultice attempt on a fresh stain before it sets deeper, and routine soapstone maintenance with fine sandpaper and mineral oil. Anything involving structural epoxy, a sink cutout, a seam, or a visible, color-critical repair on a prominent surface is worth the professional visit — the material cost difference between a DIY kit and a pro repair is usually under $100, and the risk of needing to redo it is high.
How a Professional Repair Actually Works
Most repairs follow the same core sequence, adjusted for the specific damage and material. The area is first cleaned and, for cracks and deep chips, often widened very slightly along a controlled path so the repair compound has a clean surface to bond to rather than a jagged, hard-to-fill edge. For color-matched work, the technician mixes small test batches of tinted epoxy or polyester resin against the actual slab in natural light, since color that matches under a shop light often doesn't match in a kitchen window.
- Fill: the matched compound is applied slightly proud of the surface so it can be sanded down flush rather than sanded into a slight dip.
- Cure: most repair compounds cure in 20–60 minutes depending on temperature and product, though full hardness can take up to 24 hours before heavy use.
- Level and polish: diamond hand pads progress through grits — typically starting around 200 grit and working up to 1,500 or higher — to bring the repaired area flush and restore the exact sheen of the surrounding polish.
- Reinforcement where needed: sink-cutout corners, structural cracks, and seams often get an epoxy bracket or support rod installed underneath from below, which isn't visible once the cabinet is closed up but is what actually keeps the repair from recurring.
- Reseal: on natural stone, the repaired area and often the surrounding field get resealed once the repair has fully cured.
Most chip, crack, and seam repairs are a same-visit job — typically one to three hours on-site, with the counter usable again within a day once fully cured. Reserved exceptions are large structural cracks needing reinforcement time, and any repair that turns up a bigger underlying issue (an unsupported span, water-damaged cabinetry) once the technician gets eyes on it in person.
Repair Cost vs. Replacement Cost: The Real Numbers
This is usually the deciding factor once the technical question is settled, so here are realistic Triangle-market ranges for both paths. Repair pricing depends heavily on damage size and location; replacement pricing depends on material and square footage — our pricing guide has current per-square-foot ranges by material if you're estimating a full replacement.
| Issue | Typical Repair Cost | Typical Full Replacement (30 sq ft kitchen) |
|---|---|---|
| Small chip or edge ding | $100–$250 | $1,500–$4,500+ |
| Hairline crack repair | $150–$400 | $1,500–$4,500+ |
| Seam reseal | $200–$450 | $1,500–$4,500+ |
| Stain poultice treatment | $100–$300 (often DIY-first) | $1,500–$4,500+ |
| Etch honing (small area) | $150–$400 | $1,500–$4,500+ |
| Undermount sink re-mount | $250–$600 | $1,500–$4,500+ |
| Water damage: cabinet/base repair + reset slab | $500–$1,500 | $1,500–$4,500+ |
The pattern is consistent across nearly every damage type on this list: a professional repair runs somewhere between 5% and 25% of a full replacement's cost. That math alone settles most decisions. The cases where replacement still wins despite the cost gap are the ones covered in the next two sections — recurring structural failure, a stone you've fallen out of love with anyway, or a counter old enough that matching materials or justifying the labor no longer makes sense next to a fresh start.
When Repair Is the Right Call
- The damage is isolated — one chip, one crack, one seam — rather than showing up in multiple places across the counter.
- You like the stone and the kitchen otherwise works. There's no reason to replace a counter you're happy with over a fixable flaw.
- The counter is under 10–15 years old and otherwise in good condition — the slab still has decades of life left in it.
- The damage is cosmetic, not structural — a surface crack, a chip, a stain, or an etch, as opposed to a full-depth structural crack or a rotted substrate.
- Budget or timeline is tight. A repair is typically same-day; a replacement is a multi-week project from template to install.
- The sink, cabinets, or layout are staying the same and only the stone surface has an issue.
When Replacement Is the Right Call
- Damage is showing up in multiple places — several cracks, repeated seam failures, chips at multiple points — which usually points to an underlying support problem that a slab-by-slab repair won't fix.
- A structural, full-depth crack keeps growing even after a reinforced repair.
- The remodel is bigger than the counter. If cabinets, layout, or appliances are changing anyway, it rarely makes sense to re-template around the old stone.
- You've wanted a different material or color for years and the current damage is simply the trigger to finally make the change.
- The stone is discontinued and extensively damaged — see the next section on why a perfect color match sometimes isn't possible at any price.
- An inspection reveals the substrate is failing in more than one spot, which signals it's more efficient to redo the installation properly than to chase repairs one leak at a time.
The Hidden Cost Homeowners Forget: Matching a Discontinued Slab
Here's a scenario that changes the math on an otherwise simple repair: the damage itself is minor and repairable, but it's large enough, or in a visible enough spot, that a homeowner would rather replace just that section than live with even a good repair. That's when discontinued stone becomes the real obstacle. Natural stone is quarried in finite lots — the exact slab installed in 2015 may no longer exist in any warehouse, and even the same named quarry can produce noticeably different-looking material five or ten years later as the vein shifts underground.
This is specifically a natural-stone problem; it doesn't really apply to engineered quartz, where manufacturers maintain color formulas for years precisely so a matching slab can be ordered later for an addition or a partial replacement — one more argument in quartz's favor for anyone planning a kitchen in phases. For granite, quartzite, or marble, if an exact slab match isn't available, the realistic options are repairing what's there (even a good repair beats a visible mismatch), replacing the entire counter run rather than just a section so everything matches again, or choosing a near-match and accepting a visible seam line between old and new. We'll always tell you honestly which of these applies before you commit to a plan, rather than discovering it mid-project.
Warranty, Insurance & Who Pays
If your countertop was installed recently, check your paperwork before paying for anything. Most fabricators, us included, cover installation-related chips and minor damage identified during the final walkthrough at no charge, and many manufacturer warranties on engineered quartz cover manufacturing defects — though they explicitly exclude heat damage, impact damage, and improper care, so a scorch mark or a dropped-pot chip won't be covered even on a brand-new counter. If you registered a warranty with us, our warranty registration page and care and maintenance guide outline exactly what's covered and for how long.
For damage caused by a covered event — a burst pipe, an appliance leak, storm damage to an outdoor kitchen — homeowner's insurance sometimes covers countertop repair or replacement under water damage or sudden-and-accidental damage clauses, though normal wear, slow leaks that went unnoticed for months, and accidental impact from everyday use typically aren't covered. It's worth a call to your insurer before paying out of pocket if the damage traces back to a specific covered incident rather than ordinary use.
Get an Honest Opinion Before You Decide
Nearly everything in this guide comes down to one practical truth: the safest way to know which path you need is to have someone look at it in person. A photo can't tell you whether a crack is surface-deep or structural, whether a soft spot is minor swelling or a rotted cabinet deck, or whether your specific stone will take a repair invisibly or show it. We evaluate repair-or-replace questions across the Triangle every week — serving Raleigh, Durham, and beyond — and we'll tell you plainly which one your counter actually needs, even when that answer is the cheaper one. If it turns out you do need a new countertop, browse our portfolio and real local installations, or go straight to a free quote. If you're not sure which you need, that's exactly what to call and ask.