
Here's something we've learned from years of service calls: most countertop damage isn't caused by accidents — it's caused by cleaning. The wine spill rarely hurts anyone. The "natural" vinegar spray used every day for two years, the scouring pad that seemed harmless, the bleach left to sit overnight — those are what dull finishes, strip sealers, and discolor resin. Which means the single best thing you can do for your counters is also the cheapest: learn the right routine and retire the wrong products.
This guide covers the three surfaces in most Triangle kitchens — granite, quartzite, and engineered quartz — with a shared daily routine, a blacklist of products that quietly destroy each of them, and step-by-step removal instructions for every common stain, including the poultice method that pulls even old oil stains out of natural stone. Bookmark it next to the junk drawer; stain day comes for every kitchen eventually.
The Daily Routine (It's Easier Than You Think)
For all three surfaces, daily cleaning is identical and takes thirty seconds: warm water, a drop of dish soap, a soft cloth or microfiber, wipe, rinse, dry. That's the entire regimen. The drying step matters more than people think — it prevents hard-water minerals from building up around faucets and keeps light stones streak-free. A stone-safe daily spray (pH-neutral, labeled for natural stone) is a fine convenience, but it isn't doing anything soap and water can't.
What you're *not* doing daily matters just as much. You're not disinfecting with bleach — soap already removes the bacteria that matter, and for raw-chicken moments, a mist of diluted isopropyl alcohol (70%) left for five minutes does the job safely on every surface in this guide. You're not polishing, waxing, or applying anything glossy. And you're not using the abrasive side of the sponge, ever. Simple beats aggressive on stone, every single time.
Products That Quietly Destroy Your Counters
- Vinegar, lemon, and "all-natural" acid cleaners — the #1 offender. Daily acid exposure strips sealer from granite and quartzite and can dull quartz's resin surface. (On marble, acid etches instantly — see our marble notes.)
- Abrasive powders, creams, and steel wool — micro-scratch every surface here, dulling polished finishes into hazy patches that only professional re-polishing fixes.
- Full-strength bleach and ammonia — occasional diluted use survives, but habitual use discolors quartz resin and degrades stone sealers.
- Oven cleaner, paint stripper, drain cleaner — caustic chemicals that permanently damage quartz resin on contact. If one spills, rinse immediately and thoroughly.
- Acetone nail-polish remover on quartz — dissolves resin. On granite it's occasionally useful for specific stains, but keep it off engineered surfaces.
- Generic rust removers on natural stone — most contain acids that damage stone while removing the rust. Stone-safe formulations exist; use only those.
First, Know What You're Cleaning
Stain strategy depends on which surface you have, because the mechanics differ completely. Natural stone (granite, quartzite) stains by absorption — liquid soaks into microscopic pores and sits below the surface, which is why removal means *pulling the stain out* rather than wiping it off. Quartz doesn't absorb anything — its resin surface is non-porous, so what looks like a stain is almost always residue sitting on top, or in stubborn cases, a substance that's reacted with the resin itself.
For natural stone, your seal condition is the whole ballgame. Run the water test: pour a few tablespoons of water on the counter near the sink and stove (the hardest-working zones), wait fifteen minutes, and wipe. Water beads and the stone stays light? Sealed and protected. Stone darkens where water sat? Your sealer has worn thin and stains have an open door — reseal before stain day arrives. It's a fifteen-minute DIY job we walk through in our care & maintenance guide.
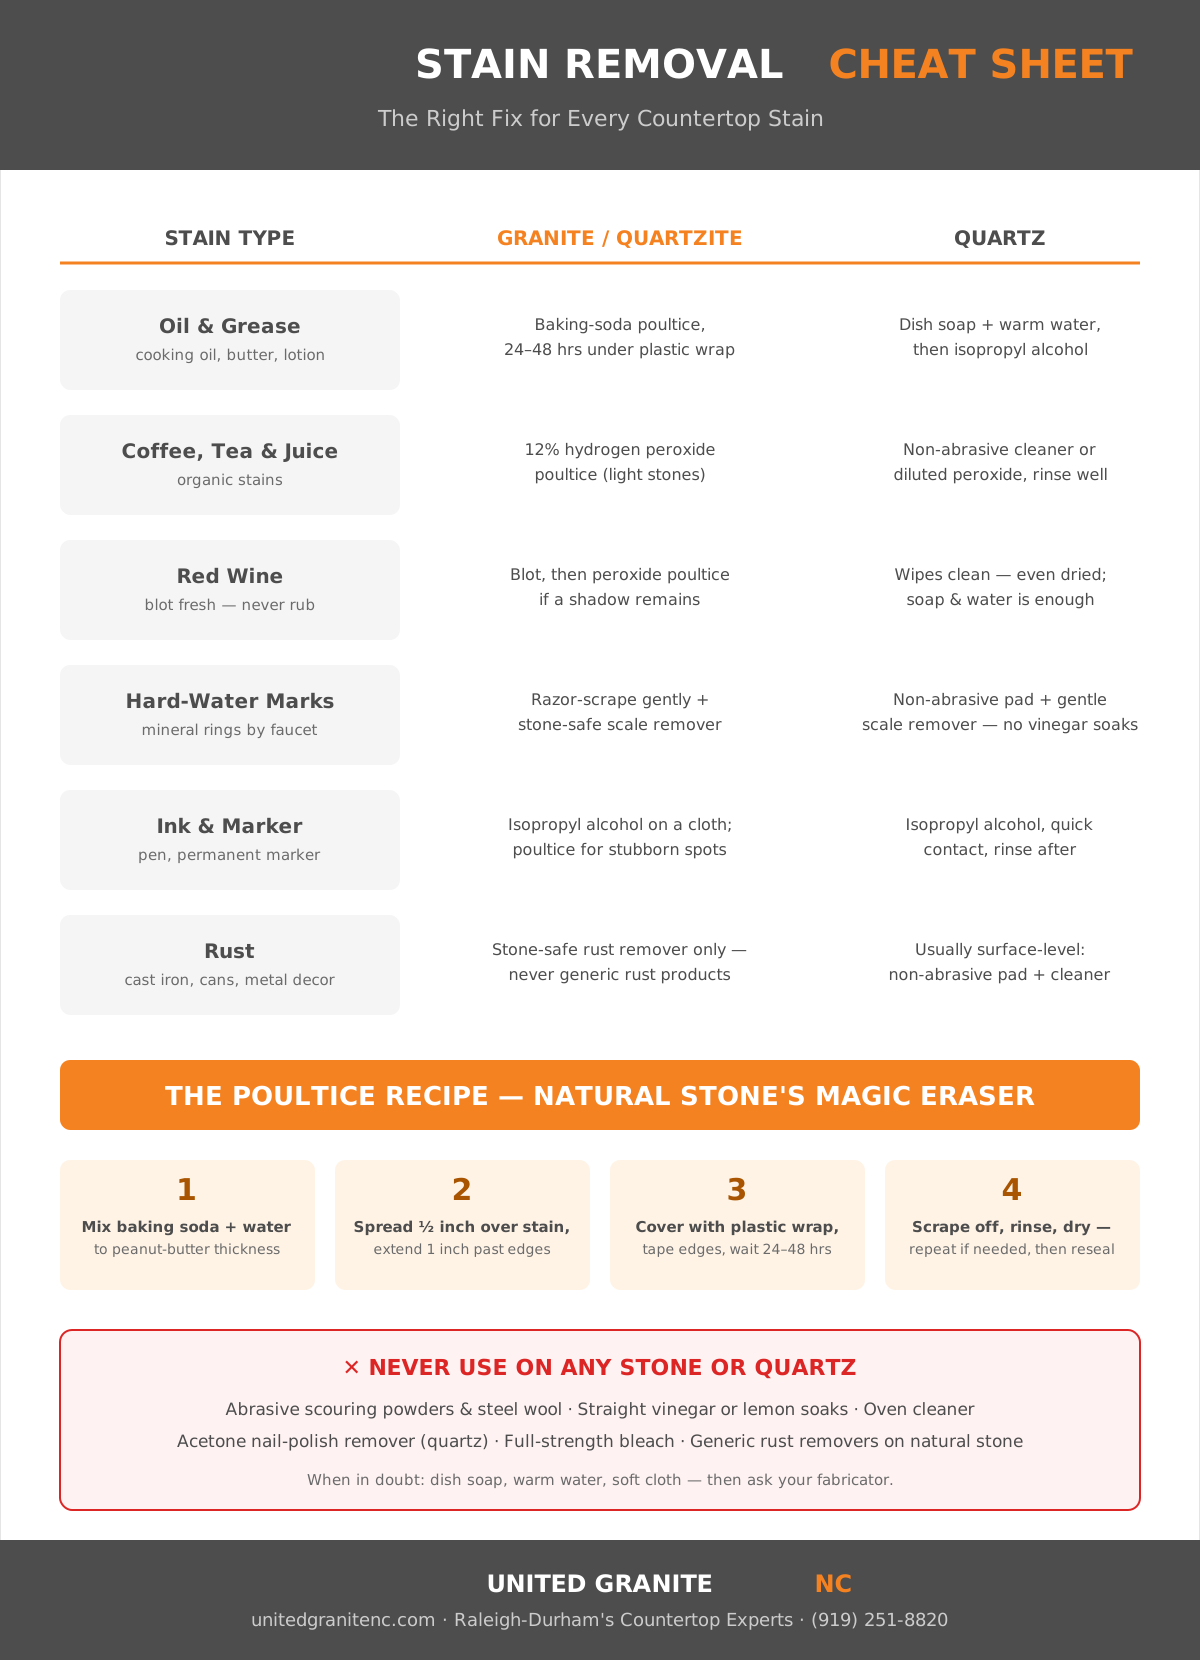
The Poultice: Natural Stone's Magic Eraser
Before the stain-by-stain guide, learn the one technique that solves most natural-stone stains: the poultice. A poultice is simply an absorbent paste that sits on the stain and slowly pulls it up out of the stone's pores — reversing the absorption that caused the stain. It's slow, cheap, safe, and remarkably effective even on stains that have been there for months.
The method: mix baking soda with water (or with 12% hydrogen peroxide for organic stains on light stones) to a peanut-butter consistency. Spread it half an inch thick over the stain, extending an inch past its edges. Cover with plastic wrap, tape the edges down, and walk away for 24–48 hours. As the paste dries, it wicks the stain up into itself. Scrape it off with a plastic scraper, rinse, and dry. Deep stains may take two or three rounds — that's normal, not failure. Once the stain is gone, reseal that area, because whatever let the stain in will let the next one in too.
Oil & Grease Stains (the Dark Shadow)
The classic: a dark, slightly glossy shadow near the cooktop or where the olive-oil bottle lives. On granite and quartzite, oil penetrates and spreads laterally, so the mark often looks bigger than the spill. Skip the soap-scrubbing (it can't reach below the surface) and go straight to a baking-soda poultice — oil responds to it beautifully, though large or old stains may need two rounds. On quartz, oil sits on top: warm soapy water first, then a cloth dampened with isopropyl alcohol for the greasy film that soap leaves behind.
Coffee, Tea, Wine & Juice (Organic Stains)
Organic stains — coffee rings, tea, red wine, berry juice, tomato sauce — leave brownish or pinkish marks in natural stone. Fresh spills: blot, don't wipe (wiping spreads the stain across more pores), then clean with soapy water. If a shadow remains on light granite or quartzite, a poultice made with 12% hydrogen peroxide instead of water is the fix — peroxide gently bleaches the organic pigment as the paste lifts it. On dark stones, test peroxide in a hidden corner first. On quartz, even dried red wine wipes off with soap and water; a stubborn ghost usually surrenders to a non-abrasive cleaner like Bar Keepers Friend *liquid* (not the powder) used gently.
Hard-Water Marks & Soap Scum
Those chalky white rings around the faucet aren't stains in the stone — they're mineral deposits sitting *on* it, which is good news. The bad news: the instinctive fix, vinegar, is on the blacklist. Instead, on granite and quartzite, hold a fresh razor blade nearly flat against the surface and gently scrape the buildup (polished stone is harder than the deposit; this is safe done gently), then finish with a stone-safe scale remover. On quartz, use a plastic scraper or non-abrasive white pad with a quartz-safe descaler, and rinse thoroughly. Prevention is a two-second habit: dry the faucet zone after the dishes are done.

Ink, Marker, Rust & the Weird Ones
Ink and permanent marker: isopropyl alcohol on a cloth, rubbed gently, removes most of it from every surface here. Stubborn marker on natural stone gets a poultice; on quartz, keep alcohol contact brief and rinse after. Rust — from cast iron, shaving-cream cans, or metal decor left on damp stone — needs a rust remover *specifically formulated for natural stone*; generic products contain acids that eat the stone along with the rust. On quartz, rust is usually surface transfer and comes off with a non-abrasive pad. Metal marks (gray lines from pots dragged across quartz) respond to that same gentle liquid-cleanser treatment. Mystery dark spots around the sink on natural stone are usually just water absorption telling you to reseal — they evaporate within a day or two once the area dries.
Heat Marks & Etching: The "Stains" You Can't Wash Away
Two kinds of marks masquerade as stains but are actually *damage*, and no cleaner fixes damage. Scorch marks on quartz — whitish or yellowed rings where hot cookware sat — are burned resin, permanent and warranty-excluded; prevention (trivets, always) is the whole strategy, as we detailed in the quartz sections of our materials guide. Etching — dull, ghostly marks where something acidic sat — is dissolved surface, mainly a marble problem but possible on stones sold as "quartzite" that are really dolomite. Light etching can be buffed out with polishing powder; deeper damage needs professional honing. If either has already happened, a fabricator can often improve it — call before living with it, and before trying anything aggressive yourself.
Sealing: Your Stain Insurance Policy
Everything above gets easier when your natural stone is well sealed, because a good sealer buys you *time* — the minutes or hours between spill and cleanup during which nothing penetrates. Sealing is genuinely easy: clean and dry the counter, wipe on a quality penetrating sealer, let it absorb per the label, buff off the excess. Fifteen minutes for a typical kitchen, once every one to three years depending on the stone and the traffic, with the water test as your reminder. Dense stones like Taj Mahal quartzite need it rarely; more porous granites appreciate it annually. Quartz and porcelain owners: this section is why you paid the premium — skip it forever.
Cleaning by Finish: Polished, Honed & Leathered
The same stone behaves differently depending on its finish, and your cleaning approach should adjust. Polished surfaces are the most forgiving day to day — the glassy surface releases grime easily and the shine hides nothing, so you'll always know where you stand. Their weakness is that any dulling (from abrasives or acid) shows plainly against the surrounding gloss. Honed (matte) surfaces hide streaks and small marks beautifully but hold oils more readily — fingerprints and cooking film show as darker patches, especially on light honed marble-looks and black honed granite. The fix is more frequent wipe-downs with soapy water and a careful eye on the sealing schedule, since honed stone is slightly more absorbent than polished.
Leathered finishes — the textured surface trending hard in 2026 kitchens — are the practical champion: the texture disguises water spots, fingerprints, and crumbs better than anything else. Their one quirk is that the tiny hollows can hold onto residue, so an occasional pass with a soft-bristle brush (a clean dish brush works) gets into the texture that a flat cloth glides over. Whatever the finish, the product rules stay identical — the blacklist doesn't care how the surface was ground.
The Twice-a-Year Deep Clean & Checkup
Beyond the daily wipe, put a twenty-minute countertop checkup on the calendar twice a year — we suggest pairing it with the smoke-detector battery ritual. The routine: clear everything off the counters, wash the full surface with soapy water including the backsplash and edges, and dry completely. Run the water test in the three hardest-working zones (sink, stove, coffee station). Inspect seams and the caulk line where the counter meets the backsplash and sink — cracked or shrinking caulk lets water reach places it shouldn't, and it's a five-dollar fix when caught early. Check sink mounting from below for any looseness. Then reseal if the water test says so.
This little ritual is also when you'll catch the slow-motion problems: the darkening zone near the cooktop that means oil is getting in, the hazy patch that means someone's been using the wrong spray, the hairline at a seam that wants attention before it collects grime. Twenty minutes, twice a year, and your counters stay effectively new — it's the entire secret to why some fifteen-year-old kitchens still look like installation day.
Building Your Stone-Safe Cleaning Kit
You don't need a cabinet of specialty products — you need six things, most already in your house. Dish soap (any brand, it's all pH-neutral enough). Microfiber cloths — a stack, so a clean one is always within reach. 70% isopropyl alcohol in a spray bottle for disinfecting and grease film. Baking soda for poultices. 12% hydrogen peroxide (sold as "food grade" or at beauty-supply stores as "40 volume" developer) for organic-stain poultices on light stone. And one quality penetrating sealer if you own natural stone. Optional extras that earn their space: a stone-safe daily spray for convenience, a plastic scraper, and fresh razor blades for hard-water duty.
Just as important is what's *not* in the kit: no vinegar within reach of the counters, no scouring powder, no "multi-surface" sprays with hidden acids or ammonia. Read labels once and decide once — the phrase you want is "safe for natural stone" or "pH neutral," and anything advertising "cuts through grease with citrus power" belongs under a different sink. Total investment: maybe thirty dollars, against counters that cost thousands. It's the best ratio in home maintenance.
Don't Forget the Bathroom Counters
Bathroom vanities live an entirely different life from kitchen counters, and their enemies are sneakier: cosmetics, toothpaste, and alcohol-based products. Perfume, aftershave, mouthwash, and nail polish remover all contain solvents or alcohols that degrade sealers and can mark quartz resin with repeated daily drips — a tray under the perfume bottles is the highest-value habit in the whole bathroom. Toothpaste splatter dries into a surprisingly stubborn film; it wipes easily when fresh and needs a plastic scraper when it's had a week. Hair dye deserves special fear on light stone — it's formulated to penetrate and it will; lay a towel down on dye day. Otherwise the kitchen rules apply directly: soap and water daily, dry around the faucet, and reseal natural stone on schedule — vanities near daily water exposure often need it a bit more often than kitchen perimeter counters.
The Five Habits That Prevent 95% of Stains
- Wipe spills when they happen — not because stone is fragile, but because zero dwell time means zero absorption. Oil and wine are patient; don't give them the night.
- Use trays under the usual suspects — the olive-oil bottle, the soap dispenser, the vitamin corner. Slow repeated micro-drips cause more stains than dramatic spills.
- Dry the sink and faucet zone after dish duty — hard water is a daily deposit, and daily prevention beats monthly scraping.
- Keep the water test on your calendar — twice a year, thirty seconds, tells you exactly when your seal needs renewing before stains find out first.
- Match the cleaner to the surface, permanently — one stone-safe spray in the kitchen, and the vinegar stays with the windows where it belongs.
When to Call a Pro (and When It's Us)
DIY handles most of what this guide covers, but call a professional for: stains that survive three poultice rounds, any etching or dullness across a wide area, chips and cracks (repairable far more often than people assume), and any seam or caulk failure around sinks. If we fabricated your counters, call us first — we know your exact stone and sealer history. And if you're still in the shopping phase and this whole article sounded like too much homework, that's genuinely useful data about which material fits your life: our materials comparison and buying guide rank every option by maintenance honesty, and a free quote is one form away.