
By the time installation day arrives, the hard decisions are already behind you — you've picked a material, tagged a slab, and waited through fabrication. What's left is logistics, and logistics is where a smooth install can turn into a frustrating one if the kitchen isn't actually ready for the crew when they show up. The single biggest cause of a delayed, rescheduled, or rushed installation isn't a fabrication mistake — it's a kitchen that wasn't prepped, a cabinet still full of pots, or a plumber who was never scheduled to disconnect the sink.
None of this is complicated, but almost none of it is obvious if you haven't been through it before. This is the checklist we actually hand customers before install day — what to line up a week out, what to clear the night before, what to expect from the crew once they're on-site, and what to check before they leave. Follow it and your installation goes exactly as fast as it's supposed to. For how the whole project fits together from first quote to final install, our countertop installation timeline guide covers the full schedule; this guide is about the one day that actually matters most.
We're writing this from the installer's side of the door, which is exactly why it's organized the way it is: every item on this list exists because we've watched its absence cost someone time. A full cabinet under the sink doesn't just slow the crew down — it can push the whole job past the point where the second half of the day was scheduled for another customer. A sink that hasn't arrived doesn't just delay your install; it means rebooking a crew, a truck, and a route that was planned around your address that day. None of this is about blame — it's simply that a countertop installation is a tightly scheduled, physical job, and the kitchen's readiness is the one variable that's entirely in your hands.
What Actually Happens on Installation Day
A typical residential installation runs 4 to 8 hours depending on kitchen size, number of seams, and whether an old countertop has to come out first. Here's the rough shape of the day for a standard kitchen replacement:
Expect a crew of two to four people, a cargo van or flatbed truck for the slabs, and a kit that includes suction-cup slab carriers, levels, clamps, a wet saw or angle grinder for any on-site trimming, a shop vac, and the color-matching and polishing supplies for seams. Most crews start between 7 and 9 a.m. to maximize daylight hours and leave buffer time for anything unexpected — a late-morning or afternoon start usually means a tighter window if complications come up, so ask about timing when you schedule, especially for a larger project.
| Time Block | What's Happening |
|---|---|
| Arrival (first 15–30 min) | Crew walks the space, confirms the plan, protects floors and cabinet faces near the work area |
| Old countertop removal | Existing counter and sink are disconnected and removed (skip this step for new construction) |
| Dry fit | New slab pieces are carried in and test-fit in place before anything is permanently set |
| Scribing & trimming | Minor on-site adjustments for walls or cabinets that aren't perfectly square |
| Setting the slabs | Pieces are set in construction adhesive, leveled, and shimmed where needed |
| Seaming | Adjoining slab pieces are clamped, color-matched seam filler is applied, then polished flush |
| Sink & faucet mounting | Sink is set (undermount) or dropped in, faucet and soap dispenser holes aligned and fitted |
| Caulking | Backsplash and perimeter edges are caulked where the counter meets the wall |
| Cleanup & walkthrough | Work area is cleaned, and the crew walks the finished counter with you before leaving |
What If You're Not Home During Installation?
Many homeowners aren't present for the entire installation, and that's generally fine as long as someone can let the crew in, answer questions about the dry fit, and be reachable by phone for any on-site decisions — a slightly different seam placement, a question about an outlet location, or confirmation before a non-reversible cut. What isn't a good idea is being completely unreachable: install crews occasionally need a yes-or-no answer in the moment, and waiting hours for a callback can stall the whole job.
If you won't be there for the end of the day, arrange for someone to do the final walkthrough on your behalf using the checklist later in this guide, or ask your fabricator to photograph the finished seams, caulk lines, and sink mounting before they leave. Most reputable crews are happy to do this — it protects both sides if any question comes up later.
How Long Does Installation Actually Take?
Most single-kitchen installations finish in a single day. What extends it: multiple seams on a large island or L-shaped run, a full kitchen plus a wet bar or bathroom vanity scheduled together, an undermount sink requiring extra cure time before it can be tested, or complications uncovered once the old counter comes off — most commonly, cabinets that turn out not to be level, which has to be corrected before the new stone can be set properly. A second day is occasionally needed for very large projects or when a waterfall edge and multiple mitered seams are involved. Your fabricator should give you a realistic estimate for your specific layout before the day arrives — if no one has, that's worth asking before you plan around it.
Galley and single-run kitchens are typically the fastest since there's at most one seam and no corners to navigate; L-shaped and U-shaped kitchens with an island usually run on the longer end of the window because of the additional seams and the care taken fitting an island against multiple walls at once. If your project also includes a matching bathroom vanity or a wet bar, ask whether your fabricator schedules those the same day or separately — bundling saves a second disruption to your week but does extend the single day's hours.
One Week Before: What to Line Up
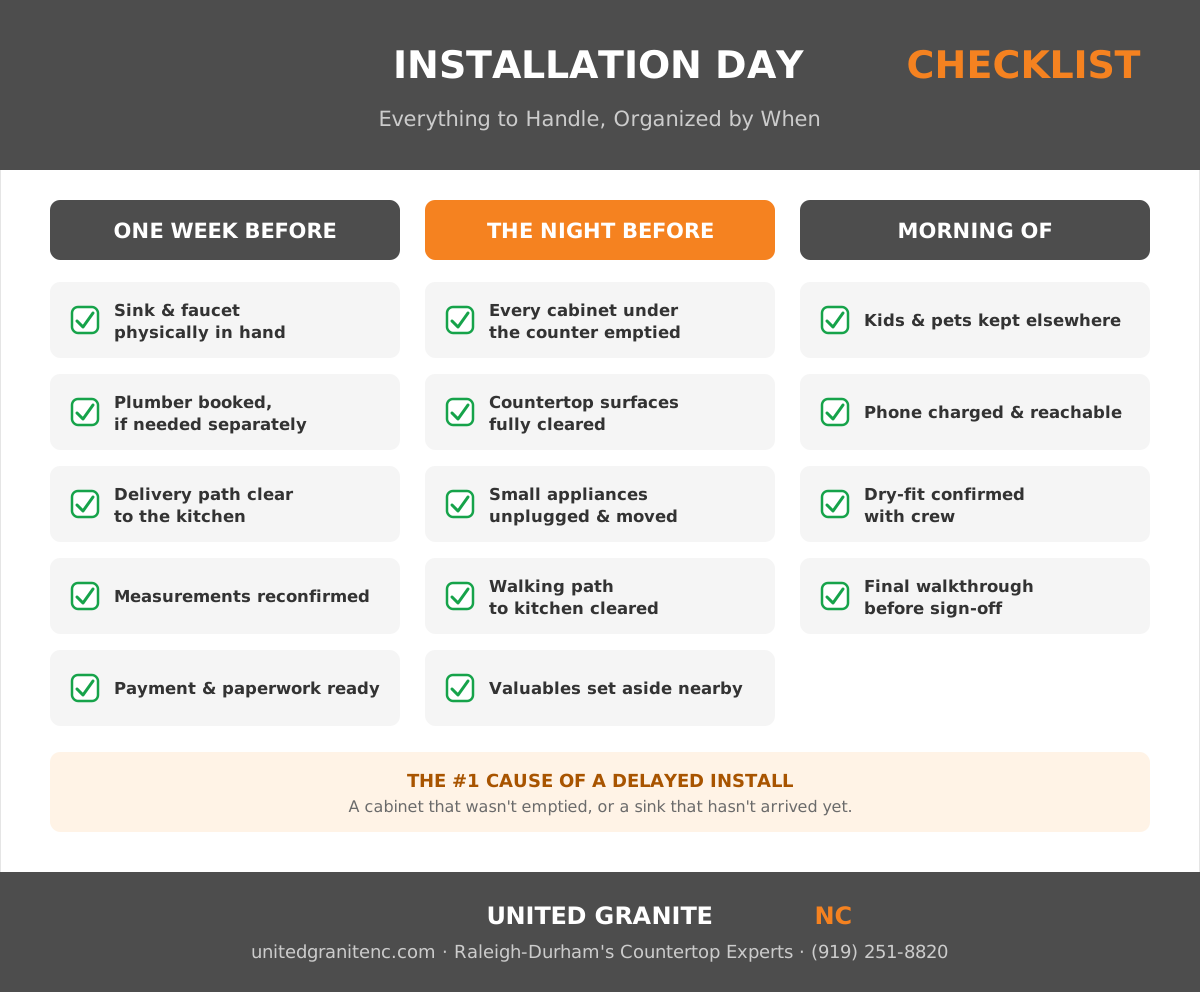
- Confirm your sink and faucet are in hand (if you're supplying your own rather than ordering through your fabricator) — delivery delays on these are the single most common cause of install-day rescheduling. Our kitchen sink buying guide covers lead times by sink type.
- Schedule a plumber if your installer doesn't handle disconnect/reconnect. Ask explicitly whether your fabricator's crew handles plumbing, or whether you need a separate appointment — this detail gets assumed both ways more often than it should.
- Order or confirm cooktop and range hood logistics if either needs to be reset during the swap.
- Clear a path for delivery — stone slabs are heavy and sometimes moved with a vacuum lift or hand truck; confirm there's a clear route from the driveway to the kitchen, including any gates, stairs, or tight turns the crew should know about in advance.
- Double check your measurements haven't changed if there's been any delay since templating — a new appliance, a change to cabinet hardware, or a DIY project in between can occasionally affect fit.
- Confirm payment and paperwork so the final walkthrough isn't held up by logistics unrelated to the counter itself.
Scheduling Around Daily Life: Work, Pets & Meals
A kitchen countertop install is a full workday for your home even when it only takes a few hours, so plan the rest of your week around it rather than squeezing it in. If you work from home, block the installation window on your calendar — between the arrival walkthrough, occasional questions, and equipment noise, it's not a quiet background task. If pets are anxious around strangers, tools, or the sound of a wet saw, arrange a sitter, a boarding day, or at minimum a closed-door room far from the kitchen rather than hoping they settle in on their own.
Meals are the detail people forget most. With the sink and often the cooktop disconnected for part or all of the day, plan takeout, a grill, or a slow cooker in another room for at least the installation day itself, and have a short list of easy options ready for the evening in case the job runs past when you'd normally start dinner.
The Day Before: Final Prep
- Empty every cabinet and drawer directly under the countertop. The crew needs full access underneath to remove the old counter, level cabinets if needed, and set the new slab.
- Clear everything off the existing counter — small appliances, dish racks, décor, anything on the backsplash ledge.
- Unplug and relocate countertop appliances to another room or a table set up as a temporary kitchen station.
- Take down anything mounted to the backsplash wall if the backsplash itself is being changed as part of the project.
- Set aside valuables and fragile items from nearby cabinets, even ones not directly under the counter — vibration from cutting or tapping can travel further than people expect.
- Clear a direct walking path from the entry point to the kitchen, moving furniture or rugs that might be in the way.
- Charge your phone and plan to be reachable — most crews prefer a homeowner present or reachable for the dry-fit confirmation and any on-site decisions.
Emptying Your Cabinets — What Goes Where
The cabinet under the sink gets the most attention, since that's where plumbing disconnect happens and where the old counter typically comes apart first — clear it completely, including anything tucked in the back. But every base cabinet directly beneath the countertop run needs to be empty, not just tidied, because the crew needs to see and reach the cabinet tops to remove old fasteners, check for level, and set new support as needed.
A simple system that works well: stack everything into labeled boxes or bins by cabinet ("pots/pans — left of stove," "baking sheets — island") so putting the kitchen back together afterward takes minutes instead of a frustrating evening of guessing. If your kitchen is your only kitchen during the project, set up a folding table in another room with a kettle, a few dishes, and anything you'll need for a day without counter access — most installs wrap same-day, but planning for a full day without the kitchen avoids any stress if something runs long.
Don't forget the cabinets that are easy to overlook: a trash or recycling pull-out under the counter, a mixer lift or appliance garage built into the countertop overhang, and any cleaning supplies stored directly beneath the sink where plumbing work happens first. If you have a water filtration system, an instant hot water dispenser, or a reverse-osmosis unit plumbed in under the sink, flag it specifically when you schedule — these are occasionally missed in a standard sink disconnect and are worth a direct heads-up so the crew knows to handle them carefully.
Who Disconnects What: Plumbing, Gas & Electrical
This is the single most common source of installation-day confusion, because "who handles the hookup" varies by fabricator, by region, and by what's being disconnected. Confirm this explicitly when you schedule — don't assume either direction.
| Item | Typically Handled By | Worth Confirming |
|---|---|---|
| Kitchen sink (disconnect & reconnect) | Installation crew, in most cases | Ask explicitly — some fabricators require a separate plumber |
| Garbage disposal | Installation crew, in most cases | Confirm if yours needs rewiring, not just reinstallation |
| Dishwasher | Often needs a plumber or appliance tech | Rarely included in countertop install scope |
| Gas cooktop or range | Licensed plumber/gas technician required | Never a countertop crew's responsibility — code requires a licensed pro |
| Electric cooktop wiring | Licensed electrician if wiring is affected | Usually unaffected unless the cooktop model is changing |
| Water line to a refrigerator or pot filler | Plumber | Schedule separately if your layout includes one |
| Faucet installation | Installation crew, in most cases | Confirm if you're supplying a faucet that needs special mounting hardware |
The pattern worth remembering: countertop crews handle what's directly part of the countertop assembly — sink, faucet, disposal in most cases — but gas lines and anything requiring a licensed trade beyond general plumbing usually need a separate appointment. Ask this question when you book, not the morning of.
Protecting Your Home During Installation
A professional crew brings its own floor protection — typically rosin paper or moving blankets along the path from the entry to the kitchen — and protects cabinet faces near the work area with tape and padding before anything heavy moves through. What helps on your end: clear that path of furniture, rugs, and pet gates ahead of time, and let the crew know about any tight doorways, stairs, or turns before they start carrying slabs, since stone sections for a full kitchen can weigh several hundred pounds each and need a clear, planned route.
Dust is lighter than people expect for a standard installation, since fabrication happens off-site in the shop — the slabs arrive already cut, profiled, and polished. On-site cutting is usually limited to minor scribing adjustments and seam work, both of which a good crew manages with wet-cutting tools and a shop vac running continuously. If your project includes extensive on-site cutting for an unusual layout, ask your fabricator what dust control they use so you can plan accordingly, especially if anyone in the home has respiratory sensitivities.
If Other Trades Are Overlapping: Flooring, Backsplash & Paint
Countertop installation rarely happens in isolation during a full kitchen remodel, and sequencing matters. Flooring generally goes in before the countertop, since cabinets need a finished, level floor underneath them — if your floor is being replaced as part of this project, confirm it's complete and cured before your template appointment, not just before install day, since the template captures exact cabinet height off the finished floor. Painting walls and cabinets is best finished before installation too, both to avoid overspray on the new stone and because painters often need full access to pull doors and drawers that should stay put once the counter is templated and set.
Backsplash tile is the one exception that usually comes after — most tile installers prefer to set the lowest row of tile against the finished countertop rather than trying to template a counter around tile that's already set, since even small variations in a tiled edge are easier to scribe tile to stone than stone to tile. If you're coordinating multiple contractors yourself, share your installation date with each of them early, and ask your countertop fabricator directly which sequence they recommend for your specific project — a five-minute phone call here prevents the most common multi-trade scheduling conflicts.
What to Do With Kids and Pets on Installation Day
Plan to keep children and pets out of the kitchen and the delivery path entirely for the day. Slab sections are extremely heavy, often moved with suction cups, dollies, or a vacuum lift, and the crew needs an unobstructed, predictable path — a curious toddler or an excited dog underfoot during a slab carry is a genuine safety risk, not just an inconvenience. If a separate room or a day at a relative's or daycare isn't an option, a baby gate across the kitchen entry and a clear heads-up to the crew about where kids or pets might appear goes a long way.
What Happens to Your Old Countertop
Removal and haul-away of your existing countertop is typically included in a full replacement quote — confirm this when you book, since it's occasionally priced separately for unusual materials or oversized pieces. Natural stone counters are heavy and almost always go to a construction debris or stone recycling facility rather than a standard dumpster; laminate and other lighter materials are more commonly landfilled since they don't have the same recycling infrastructure. If you'd like to keep a piece — a remnant as a cutting board, a small section for a side project — let the crew know before they start, since cutting material after removal is far easier than fishing a piece out of a disposal truck. If you're still weighing whether your current counter needs full replacement at all rather than a repair, our repair vs. replacement guide walks through that decision first.
A usable slab in good condition occasionally has a second life beyond your own kitchen — local habitat reuse stores and building-materials recyclers sometimes accept intact countertop sections for resale, and a neighbor doing a budget renovation may be glad to take a full-size piece off your hands. It's worth a quick call to a local reuse organization before demo day if your old counter is in decent shape and simply being replaced for a style change rather than damage — it's a small effort that keeps a perfectly good slab out of a landfill.
Sink & Faucet: What You Need to Have Ready
If you're supplying your own sink and faucet rather than ordering through your fabricator, both need to be in your hands — not just ordered — before template day, not install day, since the sink's exact dimensions drive the cutout in the stone. For an undermount sink, the fabricator needs the actual physical sink to template the cutout accurately; measurements from a spec sheet alone leave too much room for error on a feature that can't be easily adjusted afterward. Our kitchen sink buying guide covers the undermount-versus-drop-in decision and what to look for.
If anything changes between template day and install day — a different sink arrives, a faucet gets swapped for a different hole configuration — call your fabricator immediately rather than waiting for install day to mention it. A cutout templated for one sink generally cannot accommodate a meaningfully different one without additional on-site fabrication work, which can turn a same-day install into a rescheduled one.
Faucet hole configuration deserves its own moment of attention, because it's easy to overlook until install day. A single-hole faucet, a three-hole widespread set, and a four-hole set with a separate soap dispenser or sprayer each need a different number and spacing of holes drilled into the stone, decided at templating based on exactly what you plan to install. If you upgrade or swap your faucet after templating — a common temptation while browsing — double-check the new one uses the same hole count and spacing, or you'll be looking at a visible unused hole or an on-site fabrication fix neither of you wants on install day.
The Install Itself: What the Crew Will Do
- Dry fit first — slab pieces are carried in and set in place without adhesive so everyone can confirm the fit, seam lines, and overhangs look right before anything becomes permanent.
- Setting and leveling — slabs are set in construction adhesive and leveled with shims so the finished surface sits perfectly flat even if the cabinets underneath aren't quite.
- Seaming — adjoining pieces are clamped tight, filled with a color-matched seam filler, and polished flush once cured.
- Cutouts and final fitting — sink, faucet, and cooktop cutouts are test-fit, with any final on-site trimming completed as needed.
- Sink and faucet mounting — undermount sinks are adhered and clipped from below; drop-in sinks are set and clipped from above; faucets, soap dispensers, and air gaps are installed.
- Caulking — a flexible, often color-matched caulk seals the perimeter where the counter meets the backsplash or wall, allowing for natural expansion and contraction.
- Cleanup — debris, packaging, and old materials are hauled away, and all surfaces are wiped down before the crew leaves.
After the Crew Leaves: Do's and Don'ts for the First 24–48 Hours
- Don't run water in a new undermount sink until the adhesive has fully cured — ask your crew for the specific wait time, typically around 24 hours.
- Don't lean or place heavy weight on an unsupported overhang (an island edge, a peninsula) until the adhesive is fully cured, generally 24 to 48 hours.
- Avoid harsh cleaning chemicals on freshly sealed natural stone for the first few days — mild soap and water only until the sealer has fully cured.
- Keep trivets in rotation from day one on quartz, before old habits creep back in.
- Keep caulk lines dry for the manufacturer's specified cure window, typically 24 hours, before wiping them down.
- Do a final visual check in daylight — seams and caulk lines can look different under a crew's work lights than they do in your kitchen's natural light the next morning.
The Final Walkthrough: What to Check Before the Crew Leaves
- Run a hand along every seam — it should feel flush, not lipped.
- Check that the sink and faucet are fully secure and don't shift or wobble.
- Look across the counter from a low angle in bright light to catch any scratches or chips that aren't visible straight-on.
- Confirm caulk lines are clean, continuous, and fully sealed with no visible gaps.
- Open and close cabinet doors and drawers near any cutouts to confirm nothing binds or rubs.
- Ask directly whether sealing was completed on-site, or whether it's something you still need to schedule.
- Collect your paperwork — warranty information, care instructions, and your final invoice — before the crew leaves.
- Note anything that needs a follow-up visit in writing before you sign off, rather than mentioning it later.
If anything from this list looks off, say so before the crew packs up — minor chips and installation-related issues are typically covered at no charge when flagged during the walkthrough itself. If something shows up after the fact instead, our repair vs. replacement guide covers how we handle that too.
A Note on Older Homes & Unexpected Surprises
Homes built before the 1980s occasionally turn up surprises once an old countertop or backsplash comes off — out-of-square walls that weren't obvious until a straight edge was held against them, old plumbing that wasn't built to modern fitting standards, or older adhesives and flooring materials that may need a specialist to assess before work continues safely. None of this is common, and none of it should scare you out of a renovation, but it's worth a slightly longer buffer in your schedule for an older home than a newer-construction one, and worth asking your fabricator directly whether they've run into this kind of thing in homes from your neighborhood or era.
The practical takeaway is the same one that runs through this whole guide: surprises are rarely about the stone itself. They're almost always about what's underneath or around it — the cabinets, the walls, the plumbing — which is exactly why a good crew walks the space carefully before anything comes apart, and exactly why your own prep the night before matters as much as it does.
Common Installation Day Delays — and How to Avoid Them
| Common Cause | How to Avoid It |
|---|---|
| Cabinets aren't fully installed or level | Confirm with your contractor that cabinets are finished and level before template day, not just before install day |
| Cabinets and counters weren't fully emptied | Clear every cabinet under the counter run the night before, not the morning of |
| New sink or faucet hasn't arrived yet | Have both physically in hand before template day if you're supplying your own |
| No plumber scheduled for gas or complex plumbing | Confirm scope with your fabricator a week out and book a separate licensed trade if needed |
| Blocked delivery path | Clear furniture, rugs, and vehicles from the route between the entry and the kitchen |
| Old counter reveals unexpected cabinet damage | Can't always be predicted, but budgeting a buffer day reduces the stress if it happens |
| Layout changed since templating | Flag any changes — new appliance, hardware swap, different sink — to your fabricator immediately, not on install day |
Notice that almost every row in that table traces back to communication rather than craftsmanship — a question asked a week early instead of assumed, a change mentioned the day it happens instead of the morning of. That's genuinely the whole secret to a smooth install day: the fabrication and the setting of the stone are the parts we've done thousands of times and have tightly under control; the parts that go sideways are almost always the parts that depend on information passing between your household and the crew at the right moment.
Outdoor Kitchens: What's Different About Install Day
Outdoor kitchen and grill island installations follow the same core process but add a few considerations indoor jobs don't have. Weather is the obvious one — adhesive and sealant cure times can run longer in cold or humid conditions, so your crew may need a clear forecast window rather than a fixed date, and a rained-out day is a legitimate reason for a short reschedule rather than something to push through. The concrete or block base the counter sits on also needs to be fully cured and level well before template day, exactly like indoor cabinets, since an outdoor structure settles differently than interior cabinetry and is harder to correct after the fact.
The other difference is material: if your outdoor counter is granite or porcelain, as we generally recommend, there's no heat or UV concern to manage during or after installation. If you're installing a grill island with a built-in cooktop, confirm gas line work is scheduled with a licensed professional well ahead of your countertop date, the same way you would for an indoor gas cooktop — our outdoor kitchen countertops guide covers material choice for these spaces in full.
Quick Reference: The Short Version
If you only remember three things: a week out, confirm your sink/faucet are in hand and your plumber (if separate) is booked. The night before, empty every cabinet under the counter and clear a path to the kitchen. The morning of, keep kids and pets elsewhere, keep your phone on you, and walk the finished counter carefully before the crew leaves. Everything else in this guide supports those three moments.
Ready to Schedule Your Installation?
A prepared kitchen is the single biggest favor you can do for your own installation day — it's the difference between a crew that moves efficiently through a clean, accessible space and one that loses an hour working around boxes, pets, and an unexpectedly full cabinet. If you're still early in the process, our countertop buying guide and installation timeline walk through everything that happens before this day arrives. If you're ready to get started, visit our Durham showroom — serving Raleigh, Durham, and the whole Triangle — browse real finished kitchens in our portfolio, or go straight to a free quote.